
I’ll be completely honest, when I saw I had a couple of challenges in my list requiring the use of dies I figured I’d have to skip them. As regular readers know, I’m living away from home for a few weeks, and as a result don’t have my die cutter with me. Luckily I did have a few leftover die cuts that I’d made previously, and I managed to make good use of them!
So, the challenges that went into the making of this card are: Butterfly Challenge‘s butterflies and V is for vases and/or vanilla (Edit – where it was chosen as a top 3!); Mod Squad‘s and Pile It On‘s die challenges; Craft Rocket‘s things with wings: and Moving Along With The Time‘s clean and simple.

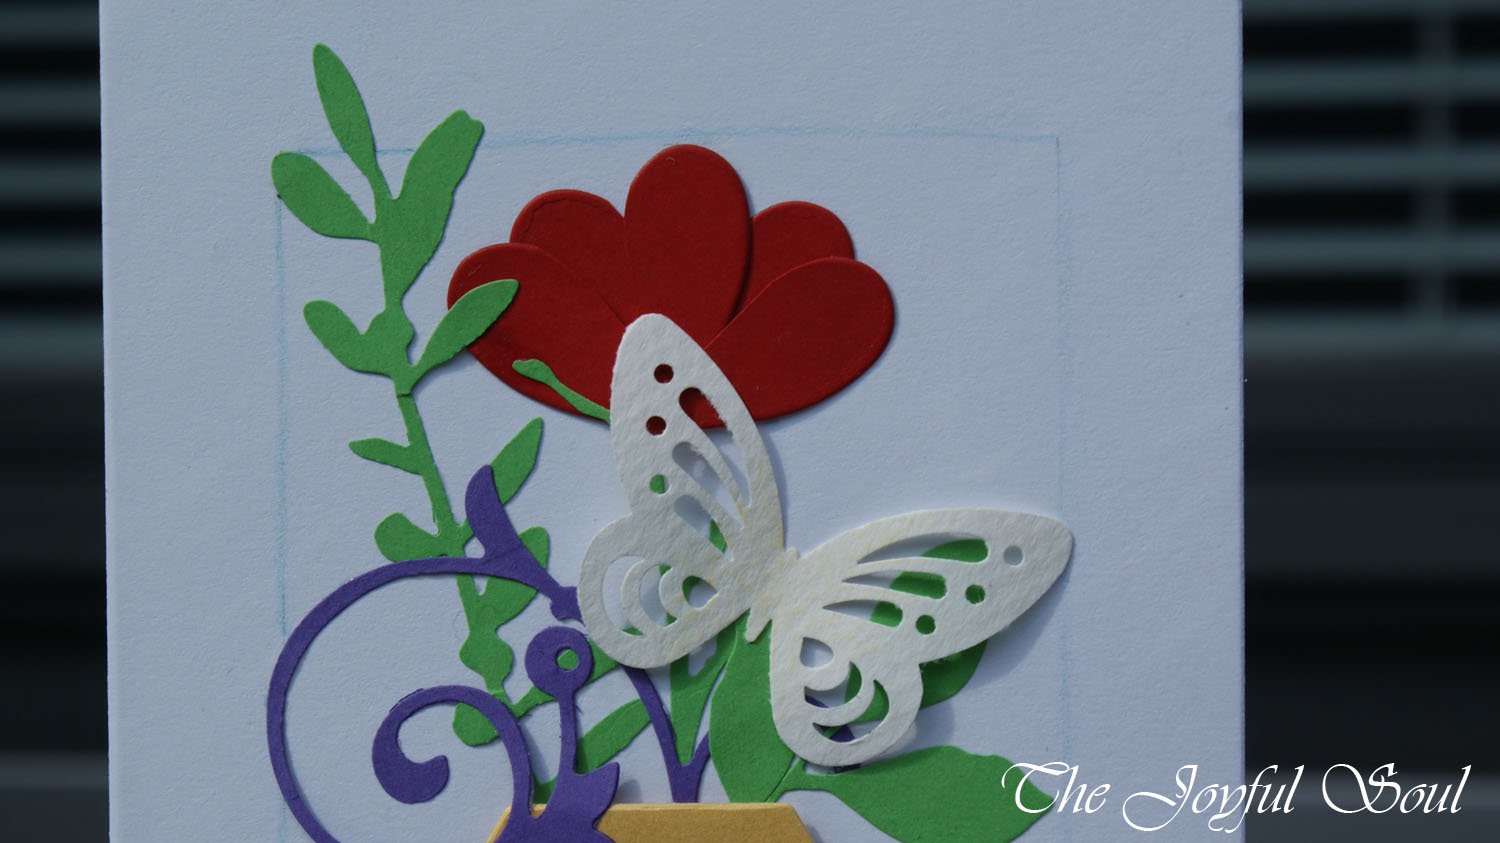
My next concern was how on earth to do a vase. I don’t have any vase stamps. I considered freehand drawing one but that was slightly daunting. Then I realised, it doesn’t have to look like a traditional vase. Vases can come in all shorts of crazy shapes and sizes – as long as it is doing the job of a vase (holding flowers) then surely I can consider it one.
With that in mind I dug out a little golden hexagon from my envelope of leftover die cuts, and that became my vase. I then took other elements that seemed suitable – I had a fair amount of greenery, and the purple swirl. No suitable flowers though… But I spotted some red hearts I had. A couple of them were half hearts as I’d snipped the overhanging parts off when making another card. I realised that if I cut a couple of the other hearts in half, and rounded off the cut edges a bit, I could create my own flower!
I spent some time fussing around with the layout before moving to my card front. First I lightly drew in where the vase would be, then I arranged all the elements on the card before starting to stick things down. I made sure to consider what would be overlapping what when I put glue, so that I could vary the depth and make it look a bit more natural. I left the end of the purple swirl loose so that I could have it overhanging the vase.
I used foam tape for the golden hexagon vase, to give it a bit more depth, then added the swirl in place on top of that.
I still needed to add a butterfly. I found a piece of creamy vanilla-ish card stock in my snippets collection and used my butterfly punch to make a butterfly. I then took a yellow colouring pencil just to add a hint of colour on the inner parts of the wings, closest to the body, just to warm the colour a bit and enhance the vanilla tones. Normally I would try to make sure to match my whites, but I kind of like that the butterfly is a different “white” than the cardstock, as it makes the butterfly seem more vanilla toned.
I curved up the butterflies wings then adhered it to the card with some liquid glue along the back of its body. I tried to position it as though it has landed on a leaf.
I decided to add a rectangle around the image, to ground it a bit more. I did this in blue pencil but in hindsight I think that is too cool a colour. I probably should have gone with a yellow to, again, bring out the vanilla tones in the butterfly a bit more.
Finally I stamped on my sentiment which is from the Altenew Super Script stamp set.
I think I like this card. I’m not certain. There are a few things I would prefer to be different – the blue line for one – but I guess I’m pleased with how it turned out overall. I do really like how the flower turned out!
Love,
Lady Joyful

Beautiful arrangements
LikeLiked by 1 person
Thank you 🙂
LikeLike
What a pretty card! I like the 3d layered effect and I do love a butterfly! I think it works really well 🙂
LikeLiked by 1 person
Thank you 😀
LikeLiked by 1 person
Awesome use of die cuts~ Thanks for joining in at Mod Squad!
LikeLiked by 1 person
Thanks!
LikeLike
My hat goes of to you for the making of this card. It just goes to show what can be achieved with not much crafting items plus a clever mind full of great ideas. Thank you for fluttering by my challenge where your card will be entered twice. Hugs Mrs A.
Ps. I rather like the thin blue line myself.
LikeLiked by 1 person
Thank you very much, Mrs A! 🙂
LikeLike
Great card, fun die cuts! Thanks for joining us over at Pile It On!!
LikeLiked by 1 person
Thank you 🙂
LikeLike
Looks great, thanks for joining us at MAWTT, xxx
LikeLike
Stunning. Love the colours. Thanks for joining us at Craft Rocket Challenge
hugs
Claudia
DT Craft Rocket Challenge
http://creativesketchygirls.blogspot.be/
http://knutselmeisjes.blogspot.be
LikeLiked by 1 person
Thank you Claudia!
LikeLike
What an explanation! I always enjoy using leftovers to make something new. Great job and cute card. Thanks for sharing with CRC. Barbara DT
LikeLiked by 1 person
Thank you Barbara.
LikeLike
Fabulous card – love how you combined all the different die cuts!
Thanks for playing at Pile It On!
Helen x
LikeLiked by 1 person
Thanks!
LikeLike