
This is one of those cards that started off being inspired by just a couple of challenges, and ended up working to fit in many more! The main source of inspiration is the current Muse challenge (edit – where this was an honourable mention) which I combined with the colour palette from Color Throwdown. I then included a whole bunch of challenges with a thank you theme – Simon Says Stamp Monday, Pile It On, Perfectly Created Chaos, and CAS-ual Fridays. I also realised once the card was done that it would work well for Addicted to CAS‘s ombre challenge.
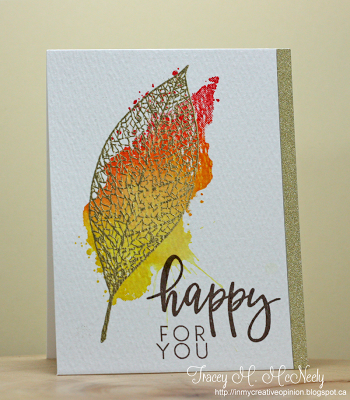
Right from the start I knew I wanted to use the tree from the Calm and Loving stamp set by CAS-ual Fridays. I would have wanted to emboss in gold but given the trouble I’d had with my rubbish gold embossing powder (ugh…) I decided to go for silver instead. I used my MISTI to line up all my components and then heat embossed them. The thank you is from Avery Elle’s Pixie Dust, but all the other stamps are from the Calm and Loving set.

Once I’d heat embossed all my elements I got started on the colouring. I used some watercolour paints and started by mixing up my colours. I wanted to include all three to colour my leaf area on the tree. Since red and green don’t work well mixed together I knew I would have to be careful with how I put the colour down. I started with a yellow-green at the bottom of the leafy area, increased the amount of yellow until I could transition into the orange, and then it was very simple to move on into the red at the top.

I applied a few different layers of colour, allowing each layer to dry naturally in between. I did consider using my heat gun to speed up the drying process but I didn’t want to warp the paper any more than it already was. At one point the transition between the colours did look a bit too sharp, given a striped look to the tree which was not what I was going for. Luckily with a bit more working on it I managed to smooth that out.

With all the colouring done I set the image panel aside and started considering what to do for the glittery strip down the side. It took me a while to come up with an idea, but I eventually decided to glitz up a bit of orange paper, helping to tie in the orange tones a bit more. Green and red could both have worked well too! I used my Wink of Stella pen (which seems to be running low… might need to invest in a new one!) to add glitter and shine to the thin orange strip.

The white panel was initially cut to be the same size as my card base, so I trimmed a little bit off of each side allowing the orange strip to show through on the side. I then used my Tombow Multi Mono Liquid Glue to adhere first the glittery strip and then the focal panel into place.

I’m pretty happy with how this turned out. It’s not exactly what I had in mind, but close enough! It was very nice to heat emboss and have it work, given the frustration I had trying to emboss yesterday’s card. I do really like how the colouring behind the tree turned out, and the silver embossing adds a nice bit of shine.
Love,
Lady Joyful

Love the ombre colour effect – really pretty, and the silver goes beautifully 🙂
LikeLiked by 1 person
Thank you! I was just looking at it again and wondering if I like it after all… Your comment made me feel better about it!
LikeLiked by 1 person
Oh good, coz I do think it’s really quite pretty and subtle 🙂
LikeLiked by 1 person
This is one gorgeous tree and wonderful ombre water coloring! The orange strip perfectly balance your card!
LikeLiked by 1 person
Thank you! 🙂
LikeLike
Gorgeous card! love the colors and the touch of gold is fabulous! Thanks for joining us this week on Simon Says Stamp Monday Challenge Blog! BArbara
LikeLiked by 1 person
Thank you 🙂
LikeLike
Way to maximize all the challenges. I love the way you created the tree base from watercolour and then addded the trunk and branches in with gold embossing! Lovely. Thank you so much for sharing with us at Muse this week!
LikeLiked by 1 person
Thank you 🙂
LikeLike
Love these colors with the gold! So glad you joined us at CTD!!
LikeLiked by 1 person
Thanks!
LikeLike
Your watercolored tree is fabulous! Love the gradient of colors. Thanks for joining us for this week’s Color Throwdown!
LikeLiked by 1 person
Thanks!
LikeLike
Beautiful – love how you stayed with a similar theme, but made it your own! So glad you joined us at Muse thsi week!
LikeLiked by 1 person
Thank you Ardyth 🙂
LikeLike
Beautiful card. Fantastic way to maximize all the challenges.
LikeLiked by 1 person
Thanks!
LikeLike
I adore the embossing on your card, loved seeing it in the Muse gallery, a real stunner x
LikeLiked by 1 person
Thank you so much 🙂 It’s always nice to receive such a lovely comment!
LikeLike
So clever – love your interpretation of Tracey’s Muse card; the orange strip on the right is so perfect!
LikeLiked by 1 person
Thank you 🙂
LikeLike
I love that you took the leaf from the muse challenge and instead used a whole tree. This really is a beautiful card.
LikeLiked by 1 person
Thank you 🙂
LikeLike
Very pretty! I love the silver embossing on top of the colors. Thank you for joining the CAS Thank you challenge over at Perfectly Created Chaos. I hope to see you again soon!
LikeLiked by 1 person
Thank you 🙂
LikeLike
This is so beautiful!! I love the ombré watercoloring and the silver embossing! Thanks so much for joining us at the CAS-ual Fridays Challenge!
LikeLiked by 1 person
Thank you 🙂
LikeLike