
I have a cute and sparkly Christmas card to share with you this evening. There are a lot of Christmas related challenges going on at the moment so it’s probably not a surprise that there’s a lot of challenges I’ve decided to enter this in! Firstly Cupcake Inspirations (edit – where this was a top pick!) asked for snowglobes which coordinated nicely with the snow theme given by both TCP Tuesday and Sweet Stampin’. AAA Cards and Moving Along With The Times just wanted Christmas, whilst Time Out Challenges and Mod Squad added the twists of glitter or shimmer and dimension respectively. Inkspirational‘s CAS with sparkle challenge went nicely with the glitter/shimmer challenge. Addicted to Stamps and More simply asked for us to make our mark, and Simon Says Stamp Wednesday said that anything goes!

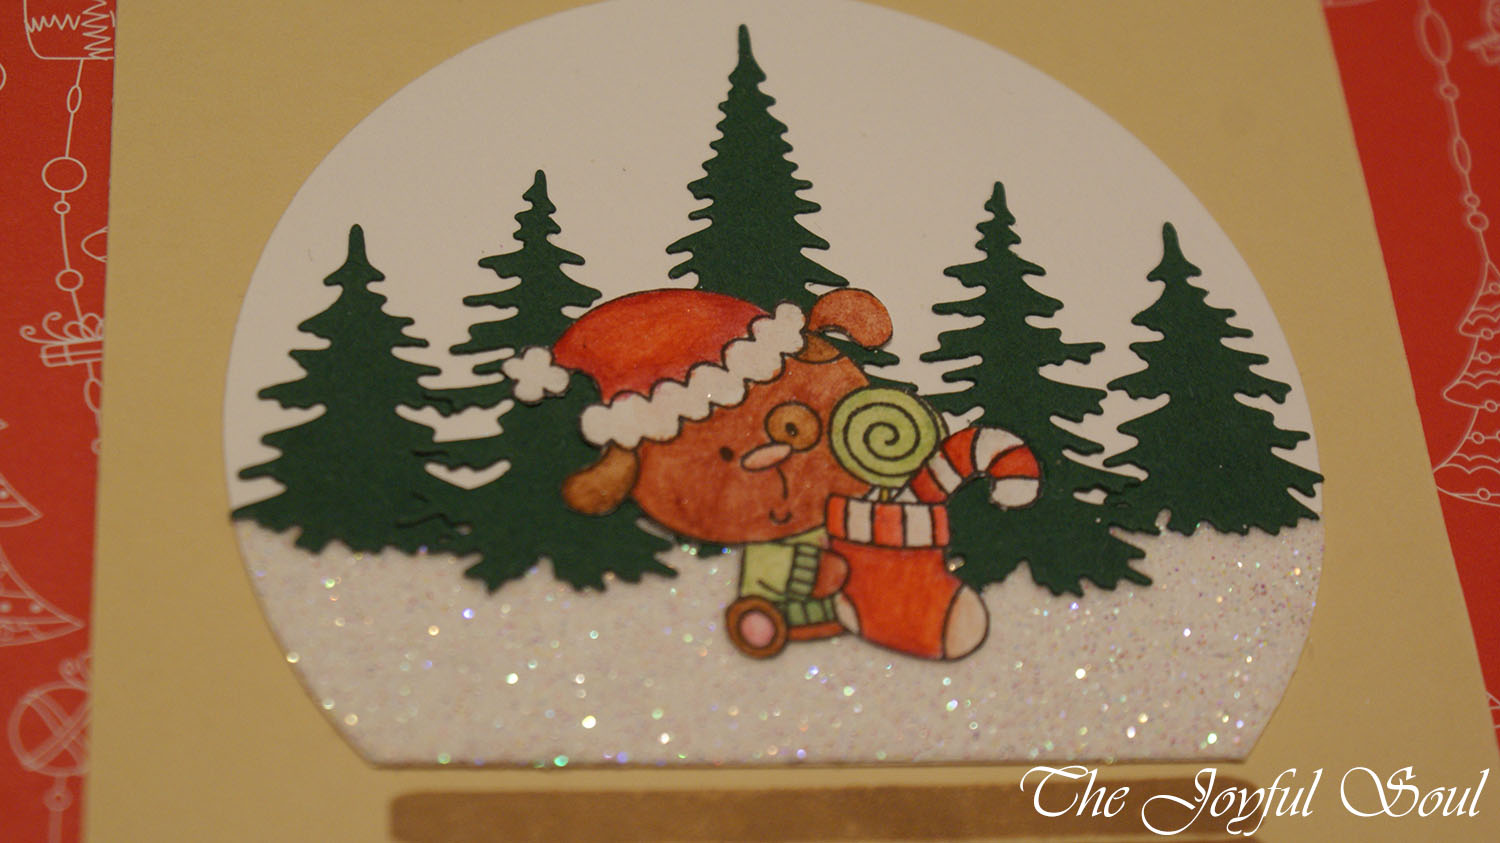
I do have a snow globe stamp and die set but as the resulting snow globe is smaller than what I wanted to use I decided to make my own. It was pretty simple – I took one of the larger Sizzix circle dies and cut a circle that slightly hung off the edge of the paper that I used. That way it had a flat bottom to give the dome effect of the snow globe.

Next I created my snow. I took a snippet of the same paper I’d used for the snow globe and coated it with double-sided tape. I then removed the backing from the tape and covered the exposed sticky side with fine white glitter. I carefully and thoroughly rubbed the glitter into the tape using my finger, and burnished it further with my bone folder before funneling the excess glitter back into the bottle. Of course, glitter being glitter, I ended up with my craft space, clothes and skin covered in glitter… But that’s just how it goes! I used Tombow Multi Mono Liquid Glue to adhere the resulting glitter paper to my snow globe and trimmed away the excess.

Next I created my trees. I used a scrap of dark green paper and ran it through my Big Shot with all three of the trees from Impression Obsession’s Evergreen Trees dies. This is actually the first time I’ve used these dies. They were sent to me several weeks ago after I won them from one of the challenges I had entered. Having used them now I really like them! They are surprisingly detailed. Once I’d cut the trees out I used my liquid glue again to adhere them onto my snow globe, adding more layering and dimension in the process.

Next I got to work on my dog. The dog is from a mini stamp set that was a free gift in my recent Pink and Main order. It doesn’t have a name on it and I don’t think it can be bought separately… But there is a similar dog in their Santa Paws set. I stamped the dog with MFT Black Licorice hybrid ink onto a snippet of watercolour paper and coloured him in with watercolour pencils. I didn’t do anything fancy with shading, just got the colour down. I then used my Wink of Stella (which is not very glittery any more!) to blend the colour out. I then fussy cut it out and adhered it to the snow globe with my liquid glue.

With the dome portion of the snow globe finished I just had to add the base and the sentiment. I decided to use a kraft/natural coloured panel for the base of the card as it would help the snow globe stand out more. I then worked out where I wanted to position the dome before stamping my base. The base part comes from Pink and Main’s Snow Globe stamp set. As I mentioned, the stamp set makes a smaller snow globe than I was making, so I had to do some selective stamping to make the base large enough. With the help of my MISTI I stamped the left side first then once I was happy with that I shifted the card over so that I could stamp the right side, elongating it in the process. (I hope that made sense!) I used a soft brown pigment ink for the stamping.
Once the pigment ink was dry (I helped it out with my heat gun) I added my sentiment. This comes from another Pink and Main set – hOWLidays. I stamped it and then heat embossed it with white embossing powder. For some reason the embossing powder stuck to everything despite thoroughly drying the pigment ink and using my anti-static powder tool. So the sentiment ended up a bit messy looking. But never mind.
Finally with all the components done I glued the dome of the snow globe in place, then glued the panel onto a pre-folded card base.
I’m really happy with how this card turned out. I think it meets all the challenges nicely, and resulted in a very sweet CAS card. I wish the embossing had worked out better, but that’s my only complaint. If I were to do it again with more time I would try to put more effort into the colouring as it is a bit flat. I do like it regardless. Also I find it amusing that I ended up using so many Pink and Main stamps in creating this! It wasn’t intentional, but they did work very nicely together.
Love,
Lady Joyful

Very cute snow globe card. Love all that glitter.
LikeLiked by 1 person
Thanks 🙂
LikeLike
Love all the sparkly snow-much better than the real stuff…such a cute festive card 🙂
LikeLiked by 1 person
Thank you! Yes glittery snow is much warmer than real snow 😛
LikeLiked by 1 person
Your globe is so sweet! Great fine glitter and takes me straight back to years ago… Thank you for joining us at TIME OUT!
LikeLiked by 1 person
Thank you! 🙂
LikeLike
This is a gorgeous and cute snow globe and anyone would love this in real life. The sparkle snowmis a delight. Thanks for joining AAA and Ink
LikeLiked by 1 person
Thank you! 🙂
LikeLike
Super cute!!! Thank you for joining us at Cupcake Inspirations, good luck!!! Amy DT
LikeLiked by 1 person
Thanks Amy!
LikeLike
Awesome snow globe,love the sparkle,and the image is super cute…thank you for joining us at ATSM
Željka DT xo
LikeLiked by 1 person
Thank you!
LikeLike
Gorgeous snow globe card Charlotte! The scene you’ve created is so cute and I love the sparkle.
Thanks for joining us at Simon Says Stamp Wednesday Challenge
Mandy xx
LikeLiked by 1 person
Thank you Mandy 🙂
LikeLike
Oh love the sparkly snow in your globe! So glad you were inspired by this week’s snow globe challenge at Cupcake Inspirations.
Debbie, DT Sweetie
LikeLiked by 1 person
Thanks Debbie 🙂
LikeLike
love your card design – thanks for sharing your project at Addicted to Stamps and More
LikeLiked by 1 person
Thank you 🙂
LikeLike
What a fabulous snow globe you created. Thanks so much for playing along at Time Out.
LikeLiked by 1 person
Thank you 🙂
LikeLike
What a cute design, the snow looks great! Thanks for joining us at Inkspirational!
LikeLiked by 1 person
Thank you! 😀
LikeLike
This is so darling! The glistening snow is purrr-fect! ;0) Thanks for joining this week’s Cupcake Inspiration Challenge.
LikeLiked by 1 person
Thank you! 🙂
LikeLike
How adorable is this!!? Love it. Thank you for joining us at Sweet Stampin’ this week. Sammy-x
LikeLiked by 1 person
Thanks! 🙂
LikeLike
Your little bear is simply adorable,nestled in a cozy, snowy, wintry wonderland! Thank you for sharing this gem in the Cupcake Inspirations Snow Globe and the Inkspirational CAS with Sparkle galleries!
~carol
LikeLiked by 1 person
Thanks!
LikeLiked by 1 person
What a cutie of a card. Such a sweet little bear and lots of glitter snow.
Thank you so much for playing along with us at Inkspirational Challenges. We would love for you to join us again soon 🙂
Pia xx
LikeLiked by 1 person
Thank you Pia 🙂
LikeLike